Step 1 Tap the
Cisco AnyConnect Secure Mobility Client icon.

A
confirmation opens the first time you start AnyConnect on the device.

Step 2 Tap OK.
AnyConnect shows the VPN connection status in the AnyConnect home
screen. Figure 1
shows the AnyConnect home screen for the iPhone. Figure 2 shows the AnyConnect home screen
for the iPad.
The AnyConnect home screen lists the names of the
VPN connection entries stored on the device, and lets you add new VPN
connection entries. The slider switch near the top lets you establish a VPN
connection using the connection entry indicated by the check mark. The Status
parameter shows the state of the VPN connection.
The tab bar at the bottom of each iPhone display provides navigation
icons for the Home, Statistics, Diagnostics, and About windows. The iPad
AnyConnect home screen integrates these functions.
Figure 1 iPhone AnyConnect home
screen
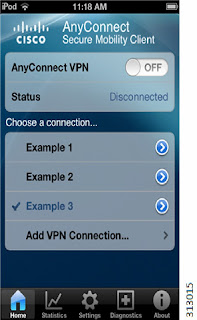
Figure 2 iPad AnyConnect home
screen
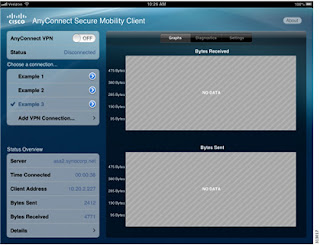
Table 1 shows the differences between AnyConnect
for the iPhone and the iPad.
Table 1
|
Differences between
the iPhone and iPad AnyConnect UI
|
|||
Feature
|
iPhone
|
iPad
|
||
Home—Opens when you
|
Displays VPN Connection controls.
|
VPN Connection controls are in the upper left
|
||
tap the AnyConnect icon.
|
Also accessed by tapping the Home icon at the
|
of the AnyConnect home screen.
|
||
bottom of the AnyConnect screen.
|
This screen remains on-display.
|
|||
Statistics—Connection
|
Tap the Statistics icon at the bottomon the
|
Status Overview panel in the lower left of the
|
||
Status Overview
|
bottom ofthe screen in the iPhone AnyConnect
|
AnyConnect home screen.
|
||
app.
|
||||
Statistics > Details
|
Tap Details in the Statistics screen.
|
Tap Details in the Status Overview panel on the
|
||
AnyConnect home screen.
|
||||
Settings
|
Tap the Settings icon at the bottom of the
|
Tap Settings in the Status Overview panel on
|
||
screen in the iPhone AnyConnect app.
|
the AnyConnect home screen.
|
|||
Diagnostics
|
Tap the Diagnostics icon in the tab bar to view
|
Tap the Diagnostics button on the AnyConnect
|
||
or delete
certificates, profiles or localization
|
home page to
view or delete certificates,
|
|||
data stored on your device, turn on debug
|
profiles or localization data stored on your
|
|||
logging, and view and manage AnyConnect
|
device, turn on debug logging, and view and
|
|||
logs.
|
manage AnyConnect logs.
|
|||
About—Displays the
|
Tap the About icon at the bottom of the
|
Tap About at the top right of the AnyConnect
|
||
AnyConnect version and
|
AnyConnect screen.
|
home screen.
|
||
licensing details, and link
|
||||
to the user guide.
|
||||
Bandwidth graphs (bytes
|
Tap Statistics > Graphs to see a graphical
|
Tap Graphs near the top right of the
|
||
received and bytes sent).
|
representation of bytes received and bytes sent.
|
AnyConnect home screen.
|
||
Step 3
|
Before establishing your first VPN connection, you must add a VPN
Connection Entry to select.
|
|||
Example 1, Example 2, and so on in the figures above are configured
connection entries. Follow the
|
||||
instructions provided by your administrator to configure a connection
entry. They may involve the
|
||||
following activities:
|
||||
a.
Obtaining What You Need Before You Set Up
AnyConnect.
b.
Using one of the
methods for Adding a VPN
Connection Entry.
c.
Using one of the methods for Installing a Certificate on Your
Mobile Device.
d.
And finally Establishing a VPN connection.
Displaying Help
AnyConnect
displays an information icon ( i
) on the lower right corner of the screen if help is available.

iPhone User Guide for Cisco AnyConnect
Secure Mobility Client, Release 3.0.x
Tap
this icon to display help information about the current options.
Alternatively, tap About in the lower right
corner of the AnyConnect home screen to display a link that provides access to
this guide.
No comments:
Post a Comment